Drywall Repair Mesa AZ is an intimidating project for home owners, but with the right tools and knowledge it can be a manageable DIY task. The first step is inspection and assessment of the damage to determine the best approach for repair.
Start with a drywall patch kit that includes a self-adhesive mesh tape and joint compound. Prepare the area, then apply the spackle or joint compound evenly, feathering the edges so they blend seamlessly into the wall.
Whether they’re caused by a nail or an accident, holes in walls are a frequent occurrence for homeowners and renters. Whether you have a small hole or a large one, a few simple steps can help repair the damage and make your wall look like new again.
A drywall patch kit contains everything you need to make the repairs quickly and easily. The kit will contain a sheet of drywall that can be cut to the size of the hole, tape, joint compound and a paintbrush for application. This is an excellent option for filling nail holes or small dents that may have occurred from home settling or other minor impacts.
When the drywall is cut to the correct size, you can install it using the adhesive included in the patch kit, and press down on the center of the hole to ensure a solid repair. You should apply a thin coat of joint compound over the entire surface and let it dry before sanding. This helps prevent cracking in the future, and it is recommended to use a fine grit sandpaper for a smooth finish.
You can then paint over the patched area, but wait until it is completely dry and sanded before doing so. It is also recommended that you use a primer, which will help to match the color and sheen of your existing wall.
For larger holes in drywall, you will need more than a patch kit. Silva recommends measuring the damaged area to determine the size of a replacement piece of drywall. This is necessary to ensure the replacement drywall is sized correctly and will be able to support the wall without collapsing into the hole again in the future.
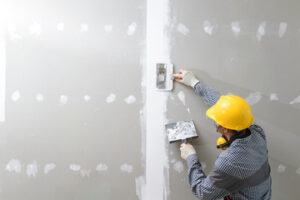
To prepare the new drywall, you will need to bed it in a layer of joint compound along the edges, and then cover the whole surface with another coat of joint compound. Then, sand down the drywall for a smooth surface and feather the edges of the patch into the surrounding wall to avoid a noticeable transition.
Replacement Drywall
Drywall is a vital component of your home’s structure and appearance, but it can become damaged over time due to accidents, moisture, or general wear and tear. If you notice damage to your drywall, it is important to decide whether you need to repair or replace the affected section. The best solution depends on several factors including the extent of the damage, cost, and long-term benefits.
Dry rot, mold and mildew, and water damage often require replacement of the affected drywall. This is a more costly option, but it will ensure that your walls are structurally sound and safe for your family. It is also important to consider how long you have lived in your home when making this decision. If you have lived in your home for less than five years, it may be more affordable and practical to repair the affected area rather than replace it.
Small holes are usually easy to patch using a drywall patch kit. These kits include all the tools you need to make a professional-looking repair. The patch goes over the hole, then joint compound is spread over the patch and smoothed around the edges to blend with the wall. You or a professional painting service can then repaint the area to finish the job.
Larger holes and cracks are sometimes difficult to repair with a patch kit. These holes can cause a weak spot in the wall, which could result in sagging over time. It is also possible that the holes are caused by more serious problems such as a shift in the foundation of your home.
Cracks in drywall can be repaired with spackle, but it is important to check with a drywall expert to determine whether the cracks are a sign of more extensive structural issues with your home. In some cases, cracks in drywall are simply the result of your house shifting as it settles, and will not cause any additional problems.
Joint Compound
Joint compound, or drywall mud, is used to fill and finish seams between drywall sheets. It’s also used to fix cracks and holes. Joint compound is different from spackle. While you can use spackle to fill nail holes, dings and dents on drywall, it’s not designed for large drywall repairs or new drywall finishes.
Joint compounds come in various types and are designed for specific phases of drywall finishing, including embedding tape, taping and skim coating. They are available as dry powders to mix with water and as ready-mix products that can be applied without mixing.
Adding water to dry joint compound will increase its working time and extend its set-time, but this can compromise the quality of the finished surface. It’s best to buy the highest quality joint compound you can afford and store it in a cool, dry place to protect it from damage.
Dry joint compounds contain a mixture of materials like limestone, talc and small amounts of crystalline silica that can become airborne when sanded, making them dangerous to inhale. Many manufacturers produce hypo-allergenic and non-toxic drywall joint compound for safer applications.
A quick-setting drywall joint compound is great for projects that need to be completed in a short amount of time. However, it can be difficult for beginners to work with because of its thinner consistency and requires more sanding than regular joint compound.
Most professional builders prefer using setting-type drywall compound, often called hot mud, as it allows them to apply several coats within a day and prevents shrinkage cracks from forming in the resulting dry wall. Setting-type drywall compound dries by chemical processes rather than evaporation, and it’s best to follow the product instructions regarding set times for maximum efficiency.
Topping joint compound, also known as a skim coat, is reserved for the very final layer of drywall and is intended to create a smooth, even surface. This type of drywall joint compound is very lightweight and easy to spread, but it’s important to let each coat dry completely before applying the next. If moisture exits through the drywall before it dries, it can cause pockmarks, which aren’t as attractive as a smooth finish and can make paint jobs look uneven.
Texture Matching
Whether you’re repairing a small hole or adding a new wall, blending the texture of drywall patching is an essential step to a smooth finish. Different textures require special application techniques and tools, so make sure you have everything you need before you begin. Also, be prepared for occasional touch-ups, as even well-matched textures may experience wear and tear over time.
Before you apply any texture, ensure the area is properly repaired and primed. This is especially important for walls and ceilings, which are more likely to show imperfections. Then, you can proceed with matching the existing texture.
To match a popcorn ceiling, you can use an aerosol spray or a hopper gun to apply the same texture in a circular motion over the affected area. This will ensure that the patch is evenly applied. If you’re repairing an entire wall, you can apply the texture to the whole wall using a brush or trowel and then sand it down for a smooth surface.
Other types of drywall texture can be more difficult to match, as they are often hand applied by tradesmen. These textures have bold patterns and may be unique to the individual who applied them. Luckily, a little bit of practice can help you master these applications and get the look you’re going for.
If you want to add a unique design element to your home, texturing drywall allows you to experiment with different looks without affecting the overall aesthetic. However, it’s important to keep in mind that changing the texture of a room can dramatically alter how it feels and functions, so be careful not to overdo it.
If you’re not comfortable working with drywall, hiring a professional is an option that can save you time and effort while ensuring the job gets done correctly. A drywall contractor will also come equipped with all the necessary materials, reducing your out-of-pocket costs. They’ll even protect the surrounding area with plastic and a tarp to prevent any mess or damage, as well as clean up all debris once the project is complete.